
This blog post explains the process of adding static files to the Sitecore filesystem without the need for deployment. This setup allows for the deployment static files like error page HTML files or making updates to them on the fly, without requiring a Sitecore release that includes additional static files using Sitecore jobs.
Sitecore Changes
Lets start with create a Sitecore template with couple of fields
Template Name: Static Page
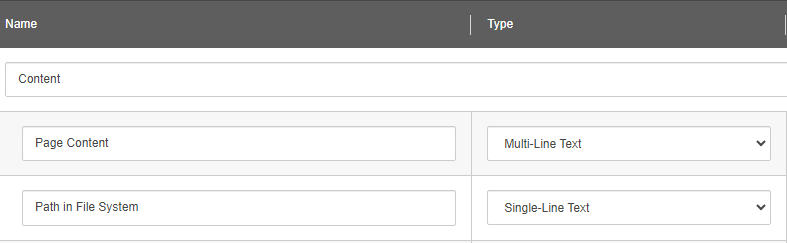
Add validation to fields as required.
Create standard values for the template and set workflow as required.
Create a folder in Global Data source or the location where you want to create Static page items and set insert options to include Static Page Template created above.
Code Changes
Create an helper class with name FileHelper.cs
using Sitecore.Data.Items;
using Sitecore.Diagnostics;
using System;
using System.Web;

namespace Foundation.Helpers
{
    public static class FileHelper
    {
        /// <summary>
        /// Process static files
        /// This method process the Sitecore and update the file in File System
        /// If no file exists, it will create a new file
        /// </summary>
        /// <param name="item">Sitecore Item used for updating the static file</param>
        public static void ProcessStaticFile(Item item)
        {
            try
            {
                if(item != null)
                {
                    // Get page content and path in file system from Item
                    var pageContent = item.Fields[Templates.StaticFile.Fields.PageContent].Value;
                    var pathInFileSystem = item.Fields[Templates.StaticFile.Fields.PathInFileSystem].Value;

                    if(!string.IsNullOrEmpty(pathInFileSystem))
                    {
                        Log.Info("Started: Processing Static file in File System at path " + pathInFileSystem, typeof(FileHelper));

                        //Write content to file if file exists or create a new file and write content
                        System.IO.File.WriteAllText(HttpRuntime.AppDomainAppPath + pathInFileSystem, pageContent);
                        Log.Info("Finished: Processing Static file in File System at path " + pathInFileSystem, typeof(FileHelper));
                    }
                }
            }
            catch(Exception ex)
            {
                Log.Error("Failed to process static file for item " + item.Name, ex, typeof(FileHelper));
            }
        }
    }
}
Add a pipeline class in your foundation project with name StaticPageHandler.cs
using Sitecore.Tasks;
using Sitecore.Data.Items;
using Sitecore.Diagnostics;
using System.Linq;
using Foundation.Helpers;
using System;

namespace Foundation.Pipelines
{
    /// <summary>
    /// Static page handler to create or update static pages
    /// This handler is called from Sitecore tasks on period basis
    /// </summary>
    public class StaticPageHandler
    {
        public void ProcessStaticFiles(Item[] items, CommandItem commandItem, ScheduleItem scheduleItem)
        {
            try
            {
                if(items != null && items.Length > 0)
                {
                    foreach(Item item in items.FirstOrDefault().GetChildren().Where(x => x.TemplateID == Templates.StaticFile.Id))
                    {
                        FileHelper.ProcessStaticFile(item);
                    }
                }
            }
            catch(Exception ex) {
                Log.Error("Failed to update static files with error " + ex.Message, ex, this);
            }
        }
    }
}
Add a config file to the project which will run the jobs on CD Instance every 5 mins (adjust the time as desired)
<?xml version="1.0"?>
<configuration xmlns:patch="http://www.sitecore.net/xmlconfig/" xmlns:role="http://www.sitecore.net/xmlconfig/role/">
	<sitecore role:require="ContentDelivery">
		<scheduling>
			<agent name="Web_Database_Agent_Schedule" type="Sitecore.Tasks.DatabaseAgent" method="Run" interval="00:05:00">
				<param desc="database">web</param>
				<param desc="schedule root">/sitecore/system/Tasks/Schedules/CustomSchedule</param>
				<LogActivity>true</LogActivity>
			</agent>
		</scheduling>
	</sitecore>
</configuration>
Compile the project and drop the compiled DLL file and config file to your local environment. This will restart your Sitecore instance
Sitecore Changes
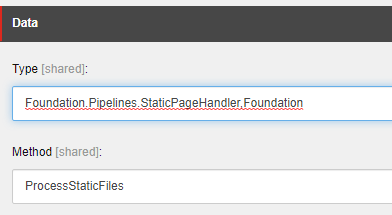
Login to Sitecore CM and go to System/Tasks/Commands and create a new folder called CustomCommands
Add a new item of Template “/sitecore/templates/System/Tasks/Command”
Set Type and method values based on your project name and method name
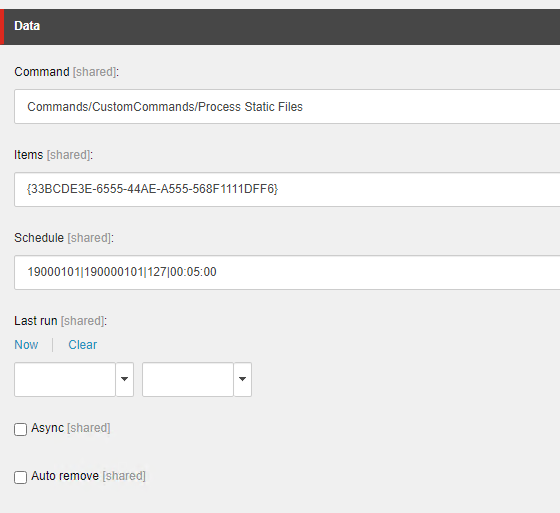
go to System/Tasks/Schedules and create a new folder called CustomSchedules
Add a new item of Template “/sitecore/templates/System/Tasks/Schedules”
Select the custom command created above
Set items as Folder created for Static Pages in Global Datasource
Set the schedule to run
Publish all the Sitecore items created
Create Static Files
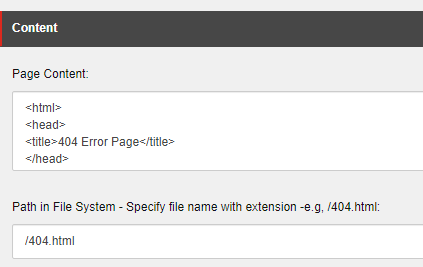
Go to the global folder created for Static pages and insert a new page E.g., 404.html
Set the page content with desired html content
set the path to /404.html (this will create the 404.html file in root folder)
If you set the workflow for the template, Submit and approve the item.
Publish the item if your workflow is not configured to publish the item on approval.
Please wait for the scheduled task to run as per the specified time (in this example, I have set it to 5 minutes). To confirm whether the schedule has executed, you can check the last run time in the Schedule item. Alternatively, you can also refer to the logs to verify if the job has been successfully executed.
Verify the file in the file system, you should now see 404.html file in root folder

If you have created the file in the root, you can access it using your CDurl/404.html. However, if you choose the file to be created in other locations, you will need to update the security settings in the web.config to ensure the necessary access is provided.