
Switching to Solr from Azure Search in Sitecore 9.3 Azure PaaS using Docker
As we all know that Sitecore has deprecated Azure Search in Sitecore Version 10 and planning to remove Azure Search in future versions, it is time to look back into Solr Search. There are a few options on how we can set up Solr for Sitecore like Spinning up your own Virtual machine in Azure and installing Solr or using SearchStax, but this method has got its own challenges.
The virtual Machine Approach for Solr involves maintenance of the Virtual Machine, whereas SearchStax is hosted within the SearchStax environment, this may not be suitable for some projects which prefer to keep everything in a single resource group.
To overcome this, we can use Dockers in the Azure web app, this will allow us to host Solr within the same resource group as your Sitecore instance and it is also low maintenance.
Requirements
Azure PaaS Environment
Sitecore 9.3
Yaml File for Docker (can be downloaded from Yml file – Save it locally)
Assumptions
Sitecore 9.3 is installed and running on Azure Search
The user has permission to add new apps to the resource group
Solr 8.1.1 is being installed (Sitecore 9.3 supports only 8.1.1)
Here are the steps to switch over from Azure Search to Solr
Setting up Solr in Azure Resource Group
Open the Resource group where your Sitecore Instance is Installed in Azure Portal
Click on Add inside the Resource Group

Select Web App

Name the Web app instance
Select Docker as Publish
Select Linux as Operating System
Select your Preferred Region
Select or Create a new App Service Plan of your preferred size

Click Next : Docker >
Select Docker Compose (Preview) as Options
Select Docker Hub as Image Source
Leave Public as Access Type
Select the Yml file you downloaded in above requirements as Configuration File

Click Next: Monitoring
Click Next: Tag
Add the tags for your web app and App Service Plan if required
Click Next: Review + Create
Verify the details in Web App Summary
Click Create


You deployment should finish in a couple of mins

Click on Go to the resource will take you to the web app
Click on the URL in the web app and verify that you see the following error

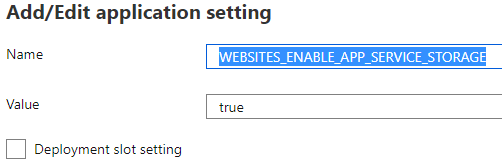
Go to the web app and Select configuration under Settings

Edit the configuration with the Name “WEBSITES_ENABLE_APP_SERVICE_STORAGE” set the Value to “true” and click “OK”
Save the Configuration
Go to the Overview tab and Restart your Web app
Wait for a couple of minutes and wish the URL again
Verify that your Solr instance is up

Use Solr default username and password (Solr/SolrRocks) to log in
Verify your Solr instance is working fine
Click on Core Admin and verify that you see all the Sitecore Indexes

Changing Solr Instance Default Password
Go to the Web App in Azure Portal
Go to Development Tools, Select Advanced Tools and Click go

This will open a new browser window (this step may ask you to verify your account)
Click on Bash

Run the following command in the bash window by replacing “your domain (with the Solr instance URL) and “newpass” with the new password.
curl --user solr:SolrRocks https://yourdomain/solr/admin/authentication -H 'Content-type:application/json' -d '{"set-user": {"solr" : "newpass" }}'Login back into your Solr Instance and verify your new password in working
Custom Search Configs
If you have Custom Search Configs for Sitecore in 9.3, then you have to add new Cores in Solr instance. Please follow the steps below to add custom Cores
Go to the Web App in Azure Portal
Go to Development Tools, Select Advanced Tools and Click go
This will open a new browser window (this step may ask you to verify your account)
Click on Bash
Run the following Command by replacing “custom-index-name” with your index name
cp -r /home/solr-sitecore-configsets/_default/conf /home/solr-sitecore-data/custom-index-name/Repeat the above step for all the custom configs
Go to Solr Instance and Click on Core Admin
Click and Add Core
set the name of the Core and instanceDir with your “custom_index-name”

Click Add Core
Repeat the above steps for all the custom indexes
Sitecore Changes
To Switch from Azure Search to Solr Search in Sitecore 9.3, follow the steps below (applies to both CM and CD)
Go to Web.config and Change the following line from
<add key="search:define" value="Azure">To
<add key="search:define" value="Solr">Go to App_Config/ConnectionStrings.config and add new Connection string value for Solr search (replace solrusername, solrpassword and yoursolrdomain name with actual values)
<add name="solr.search" connectionString="https://solrusername:solrpassword@yoursolrdomain/solr"If you have custom search configs, update the configs to use Solr search instead of Azure
Change search:require=”Solr”
remove this line “<param desc=”totalParallelServices”>5</param>
Add <param desc=”core”>$(id)</param>
Change configuration reference from defaultCloudIndexConfiguration to defaultSolrIndexConfiguration
Change documentOptions type from “Sitecore.ContentSearch.DocumentBuilderOptions, Sitecore.ContentSearch” to “Sitecore.ContentSearch.SolrDocumentBuilderOptions, Sitecore.ContentSearch.SolrProvider”
Remove coludFieldName from fields
And Any other cloud-related references
Save the changes and Restart your web apps
Rebuilding Search Indexes
Its time to populate and rebuild search indexes using the Solr Instance
Login to Sitecore CM as Administrator
Go to Control Panel
You should now see Populate Solr Managed Schema in the Indexing section
Click on Populate Solr Managed Schema and Verify you can see all the Sitecore Indexes including your custom indexes
Click on Populate and Verify all the indexes are populated
Go to Index Manager and Rebuild all the indexes including custom Indexes (This will take a while)
Verify that all the indexes are rebuilt successfully
Verify the Search is working as expected in your instance